One of the fastest and safest ways to get your files is through usenet. The only problem for a lot of people is that it’s quite hard to use, so I’ve planned to make 3 easy, step by step, guides that will open the doors to usenet for everyone who takes the time for it. In this first part I’ll show how to connect to usenet, in the second part I’ll show how you find and download files and in the third part I will explain how you can repair and make your files ready for use. This post is part 1 of the guide: connecting to usenet.
In this first part of the guide, we will try to connect to usenet. It’s a bit of work the first time, but if it works, and you don’t switch from usenet server, you only have to do this once. In this guide we will use GrabIt, not only because its user interface is one of the easiest around, but also because it’s rival, Alt.Binz, has some not-working parts at the moment.
So, GrabIt is the first essential part of the guide, you can get it here:
Download Grabit (press the incredible large FREE DOWNLOAD! button…)
The second essential part is some information about your usenet server. If you have it, you can skip to the part where we will configure GrabIt, if you think: "what the hell is a usenet server?" then calm down, we’re gonna help you searching for one. There are two options:
- You can have access to a usenet server if it’s part of you internet provider’s services, in other words, if it’s in the same package as your internet. You can find out on your internet provider’s website, use the search function very careful, it may be hidden pretty well. If you seem to have usenet, check if you have access to the binaries, if not you will only have access to text.
- If you seem to only have access to text, or if you don’t have access to a usenet server at all, this second option is yours: you need to find a paid usenet server (or a free one open to public, which is quite rare). Some important things when looking for a usenet server are:
– Access to binaries (if not, go find something else)
– Retention of the binaries (number of days posts on usenet are saved, the longer, the better)
– Speed (the higher, the better, but don’t pay for speeds that your internet can’t handle)
– Bandwith (the higher the better, the amound of MB’s you can actually download)
– SSL encryption (for paranoid people)
– Price
Now we need to find the usenet server’s information so we can connect to it, if you have option 1, the information is located on your internet provider’s website, if you use option 2, the information is located on the website where you’ve bought your usenet account.
What you need to know, * is optional:
- Username (account name)
- Password (sometimes not required if you use the usenetserver from your internet provider)
- Hostname (server’s adress, usually in the form "news.provider.com")
- Port (usually 119)
- Amount of allowed connections (if you can’t find this, it’s probably 1 or it’s called something with "amount of threads" in it)
- * server time out time
- * SSL
Write it down or know where you can find it!
Configuring GrabIt
- Install GrabIt and while doing that check the "associate NZB files with GrabIt" box.
- Open GrabIt, go to the upper left and open the "Edit" submenu and click "preferences".
- Go to the folders tab, get your settings like this:
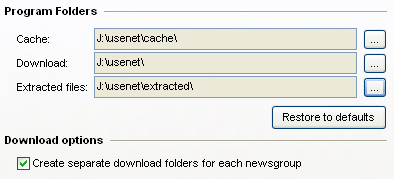
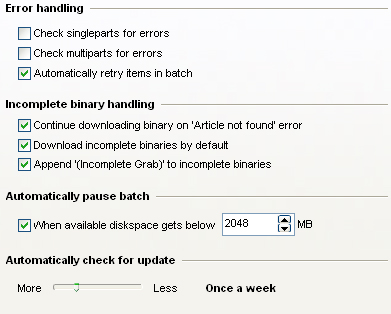
Change J:\usenet\ in your preferred folder, and put a cache folder and an extracted folder in it, so you can find everything form usenet in one folder. - Go to the Advanced tab, get your settings like this:
- Now a very important change. Go to the History tab, and get your settings like this:
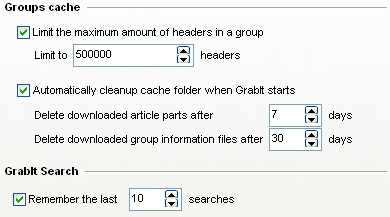
Limiting the headers will prevent your computer from crashing. - Go to the Repair and Extract tab, and make sure your settings are like this:
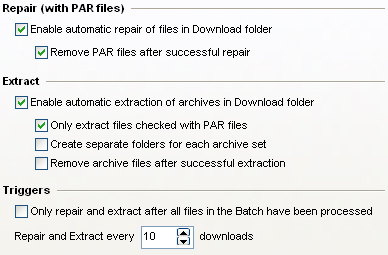
Checking the other two Extract options can spare you the time cleaning out your folder, but sometimes you want to use the archives another time… you should decide these settings yourself. - (optional) go to the posting tab and fill in the information asked, but NEVER give your real name and NEVER give a real e-mail adress. You need to have this filled in to be able to post on usenet, we’re not gonna do that in this guide.
Now we’re ready with the preferences, let’s get access to your usenet server, close the preferences screen.
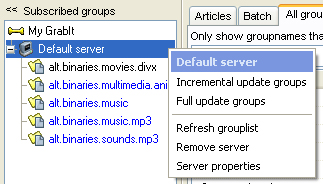
- You will probably see "Default server" in the left bar, right click it and click "server properties" from the menu box. If it’s not there, click "My GrabIt" and click "add server".
- Now find back all the information you’ve found about your usenet server and fill it in like this:
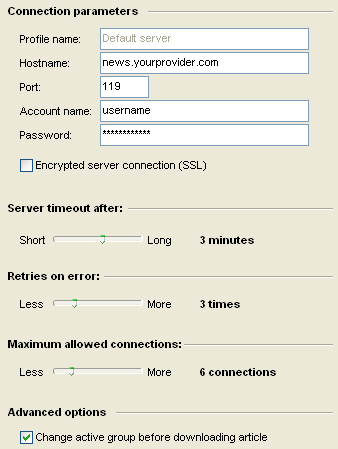
Be sure about the hostname, the username and password. If you don’t know the port, don’t change the default value, or make it empty. Check SSL if you have an SSL protected server. The server time out is quite optional. If you couldn’t find the maximum allowed connections, set it to 1. Finally press apply and/or OK.We are now ready to test if we can make connection to the server.
- Right click "Default server" and press "Refresh Grouplist". To the right, Batch will change in Batch (1) when doing this.
- Open the Batch tab, and check what’s there. Something with a green arrow in front of it should be there with the subject "update grouplist". Check the status. If it’s connecting, and there’s a progress bar, everything is working. If the status is changing between connecting and disconnecting, or there’s an error, you’ve done something wrong or the server is out, check your the error and after that your server settings, then repeat step 9.
NOTE: It can be the case that the batch is empty by the time you click on it, then you should check if there appear group names in the "All Groups (Default Server)" tab, if everything is working, these should appear. If not, start the update again, if there’s still no thread after that, check your GrabIt preferences.
- If everything works: good job, you now have access to usenet (be glad that you only have to do all this research once). You can check out what the different groups offer to you (try alt.binaries.movies.divx) and try to download a thing or two, if you don’t know how you should do that, you can wait for the second part of this guide. Have fun!
I hope this guide worked for you and I stand open to all comments on it as long they are reasonable.
The second part of the guide, Downloading through usenet, will be there ASAP, stay tuned!
thanks 😉